Healthy No Bake Cheesecake in a Jar: Gluten Free
This post contains affiliate links, which means I may receive a small commission at no extra cost to you. I only share products and services I have personally used and love. Disclosure here.

No bake anything for the win, amirite? Really, what’s not to love about no bake cheesecake. Not only is it way easier to make, you also really can’t mess these up. These healthy no bake cheesecake jars are so simple to make and taste amazing. They also happen to be gluten-free, and refined sugar free and I have an easy swap for a vegan cheesecake too.
These healthy no bake cheesecakes in a jar did not last long in my house. And I think you may experience the same thing, because these are GOOD! When I was younger, I LOVED cherry cheesecake. One time a good friend and I picked up a whole cheesecake and ate the whole thing in one sitting. Needless to say, we didn’t feel great after. Lesson learned though and that was the last time I ate that much cheesecake in one sitting.

Recently, I wanted to make my own version of cheesecake, but being the non-baker that I am, I wanted it to be no-bake. Traditional no bake cheesecake is made with heavy cream and cream cheese. There is nothing wrong with either of those. Butttt, I cannot do heavy cream. So I wanted to lighten it up a bit and make it easier to digest. Enter – full fat greek yogurt and cream cheese! Two simple ingredients that provide a similar richness and taste great.
I hope you love this healthy cheesecake recipe with greek yogurt as much as I do!
The Ingredients

Frozen cherries: I love a classic cherry cheesecake flavour, so that’s what I use here. Frozen work great, as they’re ready all year round and they’re easy to cook down into a syrupy cherry topping.
Coconut sugar: a little bit of coconut sugar added to the frozen cherries provides a little extra sweetness. You’ll also use some in the crust as well.
Lemon juice: to balance the sweetness and provide a tart flavour.
Arrowroot powder/flour: this helps with thickening the cherry topping. See substitutions for other ideas on what to use.
Greek yogurt: full-fat Greek yogurt is what will help provide lots of creaminess and flavour. You’ll want plain full-fat Greek yogurt for these.
Cream cheese: plain cream cheese is what will make this cheesecake taste more cheesy. See substitutions for other options.
Maple syrup: to help sweeten the cheesecake jars, a drizzle of maple syrup (or honey) will work.
For the gluten free crust
Pecans: raw pecans are great as forming the base along with some almond flour. Feel free to use other nuts such as cashews, almonds or even hazelnuts.
Almond flour: to help form the crust, you’ll use some almond flour. See substitutions for other options.
Coconut oil: this helps bind the crust together a bit more making the crumble hold at the bottom.
How to Make No Bake Cheesecake Jars
This no bake cheesecake in a jar is seriously SO EASY to make. All it takes is about 15 minutes! Here’s how to make them.
Make the cherry topping:
First, you’ll want to make the easy cherry topping. To do this, simply add the frozen cherries to a small saucepan along with the coconut sugar, lemon juice, arrowroot flour and water. Bring to a low simmer, stirring occasionally and cook until the mixture has thickened, about 10 minutes or so.
While the cherries are cooking, make the crust.
Make the no bake gluten-free crust
To make this easy no bake crust, all you need to do is add the pecans, almond flour, coconut oil, coconut sugar and a pinch of salt into a food processor or blender. Pulse until the mixture is chopped and starts to hold together.
Feel the mixture and press it between your fingers, if it holds together, it’s good. If not, add a little more coconut oil or one date. But since this is going at the bottom of the jar and isn’t a “real” crust, it should be fine as is.
Go ahead and add the crust to the bottom of your jars.

Make the no bake cheesecake filling
To make the no bake cheesecake filling, simply add the cream cheese, Greek yogurt, maple syrup and lemon juice to a stand mixer (or a medium sized bowl) and beat with a hand mixer or your stand mixer.

Now, add this on top of the crust layer and top with the cherry topping. You can eat these right away as is, or put them in the fridge to get a little colder.

Reasons You’ll Love This Healthy No Bake Cheesecake
- Easy to make: and they’re ready in about 15 to 20 minutes total.
- No waiting required: if you have a craving for cheesecake, you can have that fulfilled in no time.
- Easy to digest: I can’t be the only one who can’t eat heavy cream! If you’re like me and find it too heavy, this healthy no bake cheesecake is probably for you.
- Probiotics: Greek yogurt is not only tasty (and provides thickness and texture), it’s also got good for you probiotics that are helpful for your gut.

Storing
Keep the jars stored in your fridge for up to five days, it may last longer, mine didn’t because I ate them 😉
I haven’t tried freezing this, so I’m not sure if it would hold up the same. Because this is meant to be a single-serve style dessert, it’s best to make them into portion sizes that are right for you.
Substitutions and Tips
Greek yogurt: full fat Greek yogurt works best here. If you need a dairy-free option, I’d suggest a fuller fat coconut yogurt (vanilla or plain). It won’t get as thick as Greek yogurt, but it will still be delicious.
Cream cheese: I’ve used a lower fat cream cheese because that’s what was available at the grocery store. You can also make it with full fat cream cheese too. For a dairy-free option, use a plain vegan cream cheese instead.
Nut-free: use pumpkin seeds or sunflower seeds instead of the pecans, and use another type of flour, such as oat flour. You can also go the more traditional route and use graham crackers with coconut oil and process them.
Arrowroot flour: use another thickener such as cornstarch instead.
Jar size: You can use any size jar, mine were 120g or just over 4oz.

Tips:
- Let the cherry topping cool slightly before adding on top of the cheesecake filling. This will help keep the filling cool.
- I prefer these served cold, so I’d suggest waiting at least 10 to 15 minutes after making them to let them sit in the fridge. But if you really can’t wait, go ahead and enjoy!

More No-Bake Dessert Options:
I love no-bake desserts so much, feel free to check out these other options:
- No bake peanut butter pie (vegan & gluten free)
- No bake birthday cake cookies (vegan and gluten free)
- Healthy chocolate chunk cookie dough bites
- No bake cookie dough bars
- Vegan matcha cheesecake with raspberry swirl
- No bake chickpea brownies
If you make these healthy no bake cheesecake jars, I’d love to hear from you. Feel free to tag me on Instagram, and/or leave a comment, rating or review below.
This post contains affiliate links, which means I may receive a small commission at no extra cost to you. I only share products and services I have personally used and love. Disclosure here.
Print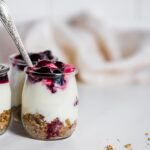
Healthy No Bake Cheesecake in a Jar: Gluten Free
- Prep Time: 5
- Cook Time: 10
- Total Time: 15 minutes
- Yield: 4 1x
- Category: Dessert
- Method: stovetop
- Cuisine: American
- Diet: Gluten Free
Description
The easiest healthy no bake cheesecake jars, ever! They take less than 20 minutes to make and are gluten-free and refined sugar free.
Ingredients
For the cherry topping
- 1 cup frozen cherries pitted
- 2 tsp coconut sugar
- 1/2 tsp lemon juice
- 1 tsp arrowroot powder
- 3 tbsp water
For the crust
- 1/2 cup pecans raw
- 1/4 cup almond flour
- 2 tbsp coconut oil softened
- 2 tbsp coconut sugar
- 1/4 tsp kosher salt
For the filling
- 2/3 cup Greek yogurt
- 6 oz cream cheese
- 2 tbsp maple syrup
- 1 tsp lemon juice
Instructions
- Pour the frozen cherries into a small saucepan along with the coconut sugar, lemon juice, arrowroot powder and water. Bring to a low simmer, stirring occasionally and cook until the mixture has thickened, about 10 minutes or so.
- While the cherries are cooking, make the crust. Place the pecans, almond flour, coconut oil, coconut sugar and a salt into a food processor or blender. Pulse until the mixture is chopped and starts to hold together. Feel the mixture and press it between your fingers, if it holds together, it’s good. If not, add a little more coconut oil or one pitted date.
- Layer the crust on the bottom of the jars.
- Pour the cream cheese, Greek yogurt, maple syrup and lemon juice to a stand mixer (or a medium sized bowl) and beat with a hand mixer or your stand mixer until incorporated.
- Layer this on top of the crust layer and top with the cherry topping. Serve and enjoy!
Notes
Serving: you can eat these right away as is, or put them in the fridge to get a little colder.