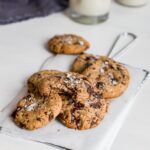
Miso Cookies: Easy & Gluten Free
This post contains affiliate links, which means I may receive a small commission at no extra cost to you. I only share products and services I have personally used and love. Disclosure here.

You may be wondering why you’d want to put miso in cookies, and I’m here to tell you why. Miso adds a depth of flavour and savoury goodness to an otherwise basic chocolate chunk cookie. And the truth is, it’s not overpowering at all. You’ll barely notice it in there, but the slight savoury flavour really adds a nice touch. And these miso cookies are gluten free and grain free too. The added benefit of brown butter ghee keeps these paleo friendly and adds even more flavour too.

All About Ghee
I LOVE cooking and baking with ghee for several reasons. One of the big reasons I love using ghee is because it tastes AMAZING. It’s richer tasting than butter and because of that, you’ll actually use less.
Here are some other reasons I love using ghee:
- High smoke point: because the lactose has been removed from ghee during the cooking process it has a much higher smoke point. The smoke point of ghee is 485FºF which means you can safely use it for cooking and baking without destroying its nutrients.
- Loaded with healthy fats: ghee contains healthy fats, specifically CLA (conjugated linoleic acid). Studies have shown that CLA may be effective in preventing cancer formation, alleviating inflammation and lowering blood pressure. Specifically, look for grass-fed ghee which has a higher concentration of CLA.
- High in fat soluble vitamins: Ghee has a high concentration of vitamin A, E and K, which are helpful for many important bodily functions from eye health, to bone health and skin health.
- Less lactose: If you are sensitive to lactose, ghee is a great option because the lactose is removed during the heating process.

Why Brown Butter Ghee?
An ingredient I love using when baking cookies is brown butter. So using brown butter ghee makes so much sense! My go-to brand for ghee is this one from Lee’s Provisions. She uses high quality organic butter, and this brown butter ghee is slightly nutty tasting and delicious. It’s perfect in baked goods, on popcorn, or in a hot beverage.

The Ingredients
Here are all the ingredients you’ll need for these delicious, gluten free and paleo miso cookies!

Brown Butter Ghee
You’ll love the addition of brown butter ghee which offers a delicious, nutty aroma and taste.
This is the brown butter ghee I buy and recommend.
Miso Paste
Miso is a delicious fermented paste that provides a salty and savory flavour. You’ll only need about 1/4 cup of white miso for these miso cookies. I don’t recommend using red miso as it’s a lot stronger in flavour and will be too intense for these cookies.
This is the miso paste I buy and use.
Almond Flour
My go-to flour when baking cookies is almond flour. I find that it results in the softest tasting cookie.
This is the almond flour I use and recommend.
Tapioca Flour
Whenever I bake things that are gluten free, I find that using more than one flour is necessary to get the right texture. Tapioca flour is another flour that I always have on hand. Also note that tapioca starch and tapioca flour are the same thing, it just depends on how it’s been labelled. Tapioca flour is very fine, and is great for using to thicken sauces, soups or anything else that needs thickening. For baking, it helps to provide some chewiness and crispiness, two things that are key for any cookie recipe.
70% Dark Chocolate
You could substitute dark chocolate chips for this recipe, but I just love using dark chocolate instead. Personally, I prefer the texture that chopped chocolate provides to this recipe. This way, you end up with a gluten free chocolate chunk cookie rather than a chocolate chip cookie. I love this brand of dark chocolate!
Date Sugar
I like using date sugar in this recipe because it has a great taste and only contains one ingredient, whole dehydrated ground dates! I really like this date sugar from LIVA which is the one I use in this miso cookie recipe.
Eggs
I haven’t tested this recipe without eggs, as they are key to binding these cookies and providing moisture to the recipe.
How to Make these Grain Free Cookies
Making these gluten free miso cookies is pretty easy! Once you have all your ingredients ready, the recipe comes together pretty quickly. I have a few tips to ensure successful cookies.
Melt the brown butter ghee
You want to have the ghee in liquid form, so heat a small saucepan over low heat and add the brown butter ghee and melt it.
Mix together the wet ingredients
Then move the ghee to a large bowl and set aside to cool slightly. Once cool, add the eggs, date sugar, vanilla extract and miso paste. Beat with a handheld mixer for one minute, until mixed very well.


Mix the dry ingredients
In a medium sized bowl, add the almond flour, tapioca flour and baking soda and whisk well.
Add the dry ingredients to the wet and stir to incorporate until no clumps remain.

Then fold in the chocolate chunks. Place in the fridge for about 15 minutes to make them easier for scooping.

Preheat your oven and line a baking sheet with parchment paper.
Scoop and bake!
Take about two tablespoons of dough and roll into a ball and then flatten with your hands. Place on the baking sheet, ensuring there is some room in between the cookies as they will spread a bit.

Place this in the oven and bake for about 8 to 9 minutes, until slightly golden. Leave them on the tray for a few minutes, as they will finish baking on there. Remove the cookies and place on a cooling rack and repeat with the remaining cookie dough.

Tips on Storing Your Cookies
Once you let your miso cookies cool completely, you can store them in a sealed container in the fridge. Personally, I like these cookies served cool from the fridge.
You can also freeze leftover cookies in a sealed plastic bag too. Simply remove the cookie from the freezer and let it sit out for a few minutes. I like them served cool!

Paleo Cookies
These cookies are not only gluten-free and grain free, they’re paleo too. Because ghee is clarified to remove the lactose, they are also considered paleo. Although I don’t follow any particular diet or label when it comes to what I eat, I know some people need to for various health reasons. And these cookies are a perfect treat to enjoy if you do have health or dietary restrictions.

If you make these miso cookies, I’d love to hear from you. Feel free to tag me on Instagram, and/or leave a comment, rating or review below.
This post contains affiliate links, which means I may receive a small commission at no extra cost to you. I only share products and services I have personally used and love. Disclosure here.

Other Cookie Recipes to try
- Gluten-Free Pumpkin Chocolate Chip Cookies
- Gluten-Free Brownie Cookies
- Key Lime Cookie Bars
- Mini Egg Cookie Bars
- Healthy Cookie Dough Bites
- Hot Chocolate Cookies with Marshmallows
- No Bake Birthday Cake Cookies
- Healthy Peanut Butter Cookie Skillet
- The Best Grain-Free Chocolate Chunk Cookies
- Pecan Chocolate Chip Cookies
Miso Cookies: Easy & Gluten Free
- Prep Time: 10
- Cook Time: 20
- Total Time: 30 minutes
- Yield: 16 1x
- Category: dessert
- Method: oven
- Cuisine: American
- Diet: Gluten Free
Description
These miso cookies have a delicious, savoury element while still having that classic chocolate chunk cookie feel. And they’re gluten free too!
Ingredients
- 1/3 cup brown butter ghee
- 2 eggs large
- 1/2 cup date sugar
- 1 tsp vanilla extract
- 1/4 cup miso paste
- 1 1/4 cup almond flour
- 1/3 cup tapioca flour
- 3/4 tsp baking soda
- 90 g dark chocolate roughly chopped
Instructions
- Heat a small saucepan over low heat and add the brown butter ghee and melt it.
- Pour the ghee into a large bowl and set aside to cool slightly. Add the eggs, date sugar, vanilla extract and miso paste. Beat with a handheld mixer for one minute, until mixed very well.
- In a medium sized bowl, add the almond flour, tapioca flour and baking soda and whisk well.
- Add the dry ingredients to the wet and stir to incorporate until no clumps remain. Fold in the chocolate chunks. Place in the fridge for about 15 minutes to make them easier for scooping.
- Preheat your oven to 350ºF (177ºC) and line a baking sheet with parchment paper.
- Take about two tablespoons of dough and roll into a ball and then flatten with your hands. Place on the baking sheet, ensuring there is some room in between the cookies as they will spread a bit.
- Place this in the oven and bake for about 8 to 9 minutes, until slightly golden. Leave them on the tray for 4 to 5 minutes, as they will finish baking on there. Remove the cookies and place on a cooling rack and repeat with the remaining cookie dough.